

I received a Raspberry Pi as a gift a few years ago. I installed RetroPie and enjoyed playing some old arcade and console games for a few months. I got busy with work and other projects and promptly forgot about the Pi.
A few months ago I stumbled upon Scott Hanselman’s post on How to Build a Kubernetes Cluster with ARM Raspberry Pi then run .NET Core on OpenFaas on his blog. Long title, excellent post, highly recommended.
Following links on Scott’s post I found Alex Ellis’ post Your Serverless Raspberry Pi cluster with Docker on his blog. Another very detailed, excellent post. Alex is a Docker Captain, Principal Developer at ADP, and author of the award-winning open-source serverless project OpenFaaS. Seriously, when do these people sleep?
I was hooked. I needed to build my own Raspberry Pi cluster.
Goals
- Build a cool Raspberry Pi cluster
- Grow my knowledge and understanding of Docker and clusters
- Ease into Kubernetes
I also thought it would great to teach my 5-year-old son more about computers. It seems installing Ubuntu on one of my old laptops so that he could watch Minecraft videos on YouTube was enough to keep him entertained. But, I digress.
Shopping List
There are plenty of options available. It’s entirely up to you to decide how many nodes in your cluster and how you physically assemble them. Here’s a list of the items involved if you want something similar to what I created.
- Raspberry Pi Model 3 (qty: 6) – http://amzn.to/2DcHvE2
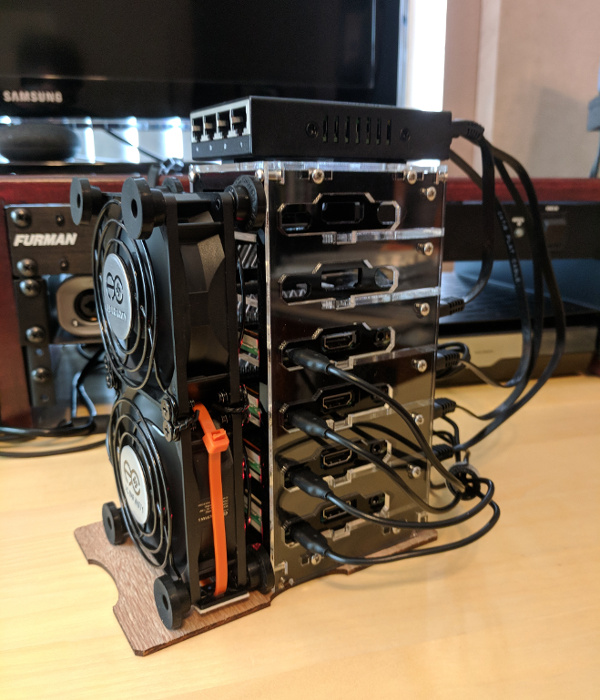
- Bramble Box 4 or 6 – http://amzn.to/2CWqgUe
- SanDisk Ultra 32GB microSDHC (qty: 6) – http://amzn.to/2DcdBA0
- Anker 60W 10-Port USB Wall Charger – http://amzn.to/2FxkUQY
- Black Box USB-Powered 10/100 8-Port Switch – http://amzn.to/2r2umJ7
- Flat Cat 6 Ethernet Cable 1 ft – http://amzn.to/2FwQeiV
- AC Infinity Quiet Dual 80mm USB Fan – http://amzn.to/2FzyKlN
Raspbian
Raspbian is probably the easiest way to get started with Linux on a Raspberry Pi. Plenty of tutorials, blog posts, and videos online. I installed Etcher on my laptop and burned the latest version of Raspbian to a microSD card. Inserted the card into the Pi and configuration was incredibly simple.
Raspbian Stretch Lite – https://www.raspberrypi.org/downloads/raspbian/
Configuring the network
It’s fairly easy to configure each Raspberry Pi to connect to a WiFi network. You may also consider plugging each Pi into a small switch, then connecting the switch to your WiFi router. However, my wireless router is located in the opposite end of the house from my office. So, I configured one of the Pis to wirelessly connect to my network. This Pi manages DNS and provides a gateway for the remaining nodes in the cluster.
Two great videos can be found below to walk you through the process:
Raspberry Pi 3 Super Computing Cluster Part 1 – Hardware List and Assembly
Raspberry Pi 3 Super Computing Cluster Part 2 – Software Config
SETI@home
Aliens! The 2nd of the above videos is what I used to install SETI@Home. When I’m not experimenting with the cluster it is actively crunching data for the SETI project.
$ sudo apt-get install boinc-client
You’ll need to create an account and attach your Pis to the project. Then, run the following command with your authenticator key.
$ boinccmd --project_attach https://setiathome.berkeley.edu/{authenticator key}
Tracking the temperature of the Raspberry Pis as they search for aliens I saw a noticeable rise in temperature. The CPU temp rose to over 80° C and began to throttle due to heat. I was able to track the temperature with the following command.
$ vcgencmd measure_temp && vcgencmd measure_clock arm
This lead me to believe that I might want to use some fans (see above shopping list). Two small 80mm USB fans are keeping each node in the low 50° C range, and no more throttling.
Docker and Docker Swarm
Next, I installed Docker.
$ curl -sSL https://get.docker.com | sh
And configured Docker Swarm on the main node, 192.168.2.1 being the IP of eth0.
$ sudo docker swarm init --advertise-addr 192.168.2.1
Then, joined each additional node to the swarm.
$ docker swarm join --token {TOKEN} 192.168.2.1:2377
With each node joined to the swarm it was time to start playing.
Docker Visualizer
To see what was currently running I turned to Docker Visualizer.
$ sudo docker service create \
  --name viz \
  --publish 82:8080/tcp \
  --constraint node.role==manager \
  --mount type=bind,src=/var/run/docker.sock,dst=/var/run/docker.sock \
  alexellis2/visualizer-arm
Portainer
You can also configure Portainer, which provide more information and management options.
$ sudo docker service create \
  --name portainer \
  --publish 9091:9000/tcp \
  --constraint node.role==manager \
  --mount type=bind,src=/var/run/docker.sock,dst=/var/run/docker.sock \
  hypriot/rpi-portainer --swarm
Redis
What cluster would be complete without Redis?
docker service create --replicas 1 -d -p 6379:6379 --name redis --constraint node.role==worker hypriot/rpi-redis
You could either install the Redis tools on one of the nodes to run some simple queries, or install the Redis Desktop Manager on your desktop and connect that way. I did both.
$ sudo apt-get install redis-tools -y
$ redis-cli -h 192.168.1.100
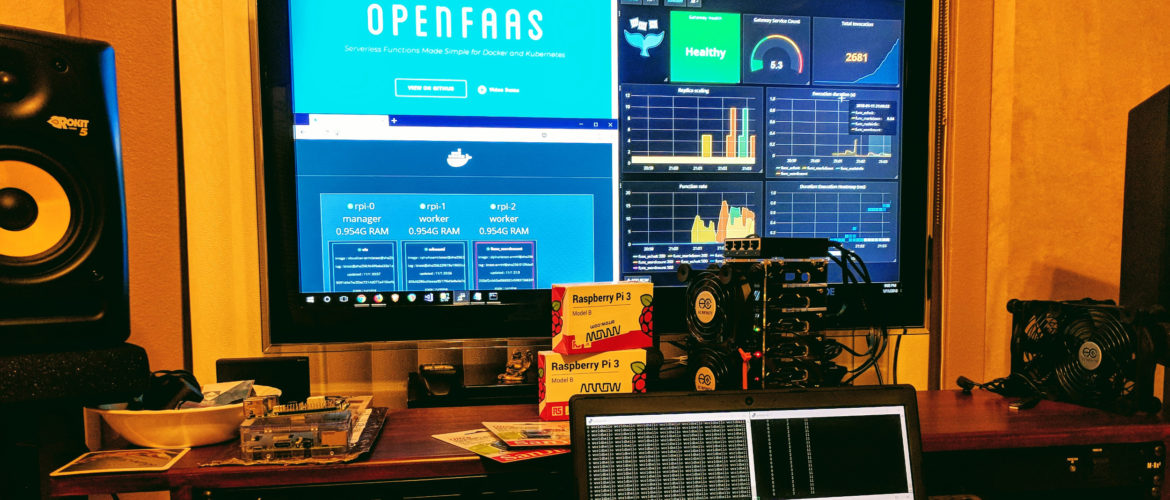
OpenFaaS
Now, time to play with OpenFaaS! On the manager node I ran the following commands:
$ git clone https://github.com/alexellis/faas/
$ cd faas
$ ./deploy_stack.armhf.sh
Magically, everything spins up and begins running. Seriously, go back and read Your Serverless Raspberry Pi cluster with Docker for a great tutorial and description of what’s happening here.
Want to see the functions scale? Run the following commands and watch Docker Visualizer.
$ while [ true ]; do curl -4 localhost:8080/function/func_markdown --data "hello world" ; done
$ while [ true ]; do curl -4 localhost:8080/function/func_wordcount --data "hello world" ; done
$ while [ true ]; do curl -4 localhost:8080/function/func_echoit --data "hello world" ; done
$ while [ true ]; do curl -4 localhost:8080/function/func_nodeinfo --data "hello world" ; done
Grafana
Everybody loves metrics, charts, and graphs. Metrics are collected and exposed through Prometheus, which is included with OpenFaaS. I much prefer the view that Grafana offers using the Prometheus data source.
I wasn’t able to find an officially supported Grafana package for arm, so opted to install Grafana in a container on my laptop.
$ docker run -p 3000:3000 -d grafana/grafana
Configuring the data source is simple, just choose Prometheus from the Type dropdown and paste in the address of the Prometheus service, http://192.168.1.100:9090 in my case.
You might also want to import a fancy dashboard, my favorite being OpenFaaS Serverless Dashboard.
What’s next?
The most time consuming part of this so far was assembling the bramble box. Seriously, installing and configuring the software is quite simple. There are plenty of tutorials out there that will take you most of the way there. And, I’ve found that most of the authors of these tutorials are easily accessible and willing to help via Twitter, etc.
Kubernetes
Docker Swarm was a breeze to configure. However, Kubernetes seems to be the new hotness. Once the newness wears off with the current state of the cluster I think I’ll try my hand at Kubernetes.
.NET Core functions
I’ll be working on my own .NET Core functions to deploy to the cluster. Maybe some kind of validation service? Perhaps something that interacts with Redis?
Suggestions?
Do you have a suggestion on what I should do with the cluster? An idea for an additional function? I would love to hear from you. Let me know your thoughts.
An International Speaker, Author, and Microsoft MVP, John has been a professional developer since 1999. He has focused primarily on web technologies and currently focuses on C# and .NET Core in Azure. Clean code and professionalism are particularly important to him, as well as mentoring and teaching others what he has learned along the way.